Sunday 2 June 2013

PAINT TO MUSIC !!!

what an amazing way to end this journey of learning new things!!! 

paint!!!!


 To
music !!!                                      


                     This was an awesome outdoor activity which was held by the lakeside of my university.    
                                         YES! we own a lake. ;)


Basically we had  to put up our canvas and listen to different types of music and paint! let our emotions work!  there wasnt any right or wrong here!
any medium! can be fabric paints! spray paints! acrylic! or anything.

i used acrylic paints.  different brushes and rollers! my hand !  cmon , i know its crazy but hey ! this is fun!
                                                               
                                                          MY TOOLS !!


                                                      Thats my canvas!!


so thats the artist canvas i used ! 


yes! thats me and aliff , ready to rock and roll!  see the beautiful background? 


art on classical songs! 


so first we  listened to classical music,  to be honest. i never listen to classical music. but this collection was amazing. i loved it .  and i learnt its good to try out new stuff.
it made me feel so relaxed . i felt like i was somewhere in the forest or a large landscape, with different colours. nice sunset ! and lots of trees around me.  and i was laying down on the ground . very peaceful.


after painting to classical music, we had a break !
andddd i got burnt friessss!
which ruined my mood. and i was angry and mad.

so the next painting was to contemporary music! which is my favourite,  but i was already mad and so my emotions played a great role on my  this painting. its deep !

thats my second painting.
i was mad !
and i didnt want to use any other color besides deep and dark colors like red and black. and abit of grey.

the back of these two girls shows my frustration , and red is anger.
 but guess what ! i felt so much better after painting.

and i had fun!


so thats my 2 canvases! 
classical and contemporary music . may 2013 

what an amazing outdoor activity  i must say ! and i would like to thank MS.LISA, for these 2 amazing semesters , i really learnt alot ! 


Tuesday 7 May 2013

JADI BATEK . designing - batek-ing

I was very excited to know that we were going to a batek factory , however i had never tried batek-ing in my life, and i had no idea how batek-ing is done.  but i was ready to learn and gain new skills.

However , i did abit of research and wanted to see how these batiks actually look like and how they are done .
I looked into my cultural batik work.  and these are some of the batik work which inspired me.


This is basically african  batik.
since , Africa itself is known for its national parks and wildlife . people do alot of art work related to it .
also the traditional dances using drums is the most popular activity in african culture.
I also watched some videos on youtube which were related to canting and i  found it quite interesting. and i got some tips , so i was prepared for the actual day's activity.  this is the link of one of the videos. 


YES! WE ARE HERE! 


when we got  to the factory on the day itself,  we were introduced to a person who was handling the batek. we were given  a brief explanation about how to go about and what to do and what not to.   i was already motivated by seeing the amazing work done by these creative and skillful workers. they were passionate about their work, this even made me more excited to look forward for this day.


this was their work , which was hung from the ceiling.  and it looked beautiful .


this worker had just started his work. he was canting the silk. 


Before the batek day , we had to come up with bizzare ideas to make our batek,, this was basically a group assignment ,  and since my group consisted of mixed culture people. we decided to use symbols that represents our cultures. however we had other ideas aswell before coming to conclusion these ideas included,. under water creatures,  retro vintage, superheroes and a few to mention .


so basically that was how each of us decided to do our batek, the peacock represents the indian culture , the koi  represents chinese  culture and lotus is symbol of  faith , also that we wanted to use waves to represent motion .  so basically the peacock feather patterns  are then put up as the  waves. 
combining all three we decided to make it a panaromic view.  
each of us had to work with certain piece of work. i had to work on the peacock. 

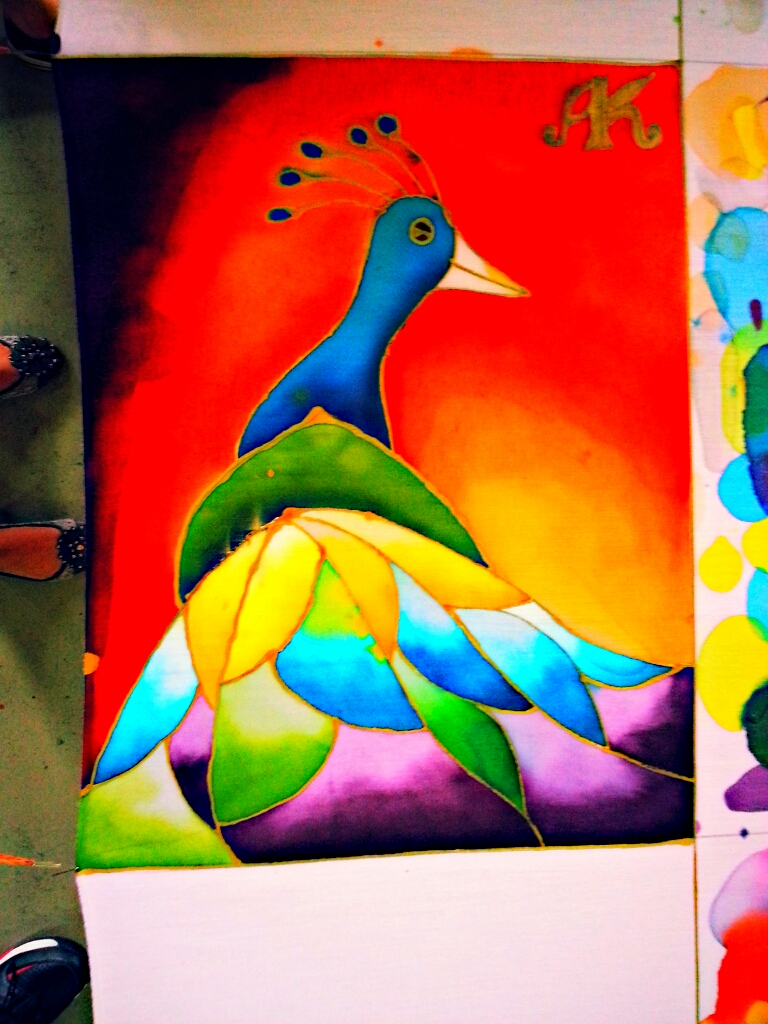
actually , this was the best out of all. i love the peacock colours.  the royal colours such as blue , green . it makes it one of a kind.  however we didnt want to use the exact pattern of the peacock feathers so we decided just to have a simple feathery pattern with royal colours to make it look elegant.

I had looked into the colours of peacock feathers as part of my research and also found several patterns.


This is was my part of work .


we first drew with pencil since we are not so used to waxing straight. to make it easier  for us to wax.basically hot wax was used for separation of colours.  it was super hot , and we had to be really careful and cautious while making the outline as it would burn if mishandled. 
after making the outline , we started applying the dye accordingly . there were alot of colours that we could use.  we could also mix water to dilute and give it a wash effect.  

this was the canting used to make the barriers in order to avoid the mixture of colours. 

 the hot wax and canting


cups of different colours. 


this is my piece of work. 


i would like to share my other group members work which led to give out an amazing panoramic piece of art work. 


                                                 The  process of making masterpieces


                                                   This is my  group . yes ,im the only girl.
                                                   and because of that , i get to pick the peacock :)


                                   apart from working and learning new things , we had fun for sure.


this is towards the completion of our work.  and i was excited to see how it would look like when put together. 


this is my piece of work.  oh! i have my monogram on the top right. :) 

this was the final product obtained from the batek factory . 

this was not it.  to put all 4  batek paintings was even more exciting and awesome, and i must say i have gained alot from this trip and activity , i know how to use hot wax , and im hoping to practise more during my free time . not forgetting minor mistakes made which will be rectified with practise. 
\

this is the panaromic view of our work .


we also tried putting up in different ways on different backgrounds, such as windows and floor.


this was a great work done  by  me , aliff , jun and kush :) 
awesome stuff ! 

paranomic view .


this activity was a great platform to explore , see what are the problems that we faced. how creatively did we solve it . for instance : we had the panaromic view concept, after getting our bateks we realised that we were off alignment , so  we decided to fold our materials to have it all of one size and also have a balanced composition .  
otherwise, this was a great activity , im surely looking forward to  practise more of batek in future. 
*thumbs up*


not to forget to share some of my friends work , as it really inspired me ! 


collage of my friends work:) 

Everyone had their own touch and everyone came out with awesome piece of work ! 


Monday 6 May 2013

monogram - assignment posters

soo after printing my monogram on several items as seen in my previous post.  we are supposed to make a poster. A2 sized , any material to be used.

Before making a final one,  i tried on several materials.
tried pop art theme aswell . wasnt a bad idea but i thought i could do more.


it came out something like that, this paper is made out of newpapers and leaves mixed. 
quite interesting actually ! 


However i decided to try different designs on mounting board. things needed are posters colours, sponge, plastic to make stencils and  double sided tape.
i wanted to experiment more. 
.


i decided to use multi color theme on a white water colour paper.
with a curvy leafy frame to balance it.


                                            this is was preview of how it would look like.
                                      I had to make stencils for my leafy frame aswell.


i used poster colours and sponge to paint it . 
i used primary and secondary colours.


this is my final piece of work .


                               However i tried  taking pictures of it in different mode. like polarize and negative .
                                    and it looked amazing :)  i loved it .


I also tried printing my monogram on a mounting board with the same colours .  but using a different frame and different colour for it.
this time around , i used a circular frame , curvy .  however the multi colour theme didnt work out well here.  so i used  orange, green and yellow.
Again , i was experimenting .


Rule of third and composition was highly considered.  i was experimenting on what and how would the monogram look the best .
i also learnt that , before finalizing any product . we must experiment and see which one looks the best out of all the good work we do. 

Here i am!woohoooo!


In the making of ...... a  designer. :) yes so thats my monogram printed on several items. 
this activity actually made us create our own monograms that represents us, im hoping to use it in my future designs. (:
im proud of my monogram design . and  i loved this activity ! 


Thursday 4 April 2013

MONOgrams - logos


Basically when making a monogram or logo, first thing to consider is where you will be putting this monogram ? on what items? sizes?  fonts?  and so on .

Looking into different monograms i came up with a few  to suit my initials which is ''AK" 
yes, sounds  like AK 47 :P

Before anything , i googled different designs which were related to ''aK'' my initials.  just for basic ideas.


I also watched some youtube videos which gave monogram printing tutorials.

http://www.youtube.com/watch?v=ND1AUJhdUZc
http://www.youtube.com/watch?v=3SDZCS7cM5I

However , I sketched out a few on my  sketch pad .  and i actually found this activity interesting,  i actually had my own logo at the end of the day.  I did alot of research related to these monograms. 

                                          Here are a few "AK'' designs .


After choosing the one which would represent me the best , i adjusted the design in different forms and sizes and also spacing .. seeing whether over lapping would look better or just plain and simple.


have it a leafy curves. and pointy at some areas.  and also bottom having a girly look.  


final logo :) 


whats the next thing ?  yeyyy! 
Trying to make stencils for printing, 
To make stencils we need a cutting mat , plastic papers, rulers and other mini needful stuff.
however paste the logo on the plastic and stick it carefully, note:  plastic is slippery if not stuck well, the paper can move away and the design might not come out well. 
also the blade used should be sharp for a clear cut.


so basically the stencils could be used in either way , totally upto the user . 
what i did, is i resized my logo to different sizes for different purposes. hence stencils are prepared .  note:   the logo may not be appropriate on every items you come across.  
but again its totally fine trying out on different items, you never know sometimes it might look good than you  thought . 


I made these stencils  for  different use,   phonecase, pillow cover  also the  logo as my photography signature. 


these are just trials.

i flipped over the pillow and made a different print on the other side, however these prints could be also used on other items like a folder , paper case, wallet , laptop decoration. 

how do u print them manually? 
first cut them into different sizes using a very fine sharp blade.
 after cutting the stencils , several mediums could be used such as fabric paints , spray paint , marker and much more. 
i have used mostly spray paint and fabric paint for my items. 
during spraying , the other part should be covered carefully using papers in order to avoid unnecessary mistakes. 

These are my logos cut in different sizes. 


So the following are items i printed my monogram on.

                       A friend's phone cover          


My laptop :):)


My wallet 


                                                          paper folder


plastic paper case


                         This is the other side of the pillow.
                               *Just Experimenting*


Like i said , anywhere u print your monogram it just has to look good, gives aesthetic value. 
my learning outcomes :
guess what? 
i made my own monogram! 
i had fun!


This is my work, my monogram and im lovin' it ! :)                                                                        


******